
If your car has electrical components that stopped working, it starts but suddenly dies, or it doesn’t start at all, you may be prompted to test the ignition switch before removing it. Read on to learn how to test the ignition switch on your own.
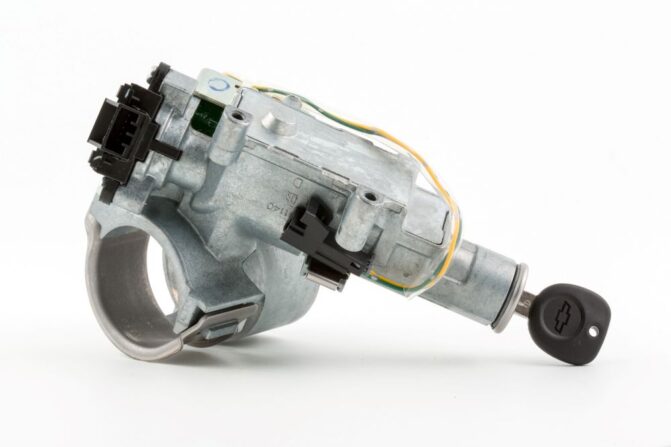
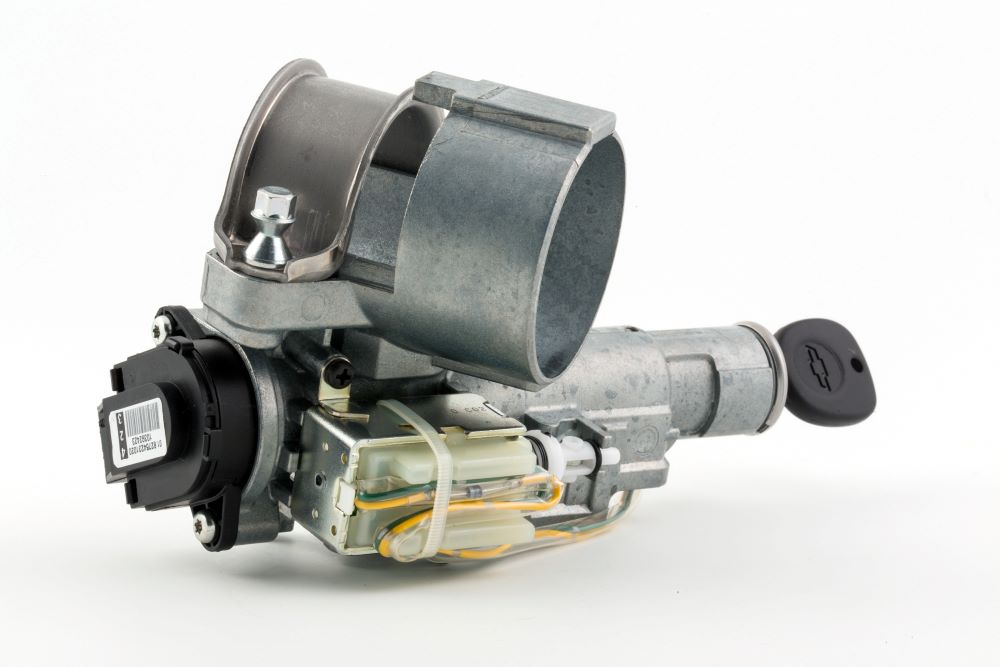
The ignition switch is a critical electrical component located on the steering column of a car. It works together with the ignition lock cylinder to turn on and start the vehicle. But just like any other electrical facet, it may become faulty over time and begin to have issues. As a result, it’s essential to have it tested to find the underlying issue. But before we proceed on how to test the ignition switch, it’s prudent you first understand the symptoms of a dysfunctional or failing ignition switch.
- Symptoms Of A Bad Ignition Switch
- Testing The Ignition Switch
- Replacing The Ignition Switch
- Starting With A Bad Switch
- Key Takeaways
Bad Ignition Switch Symptoms
If your vehicle is having trouble starting, it gives you clear signs before breaking down. if your ignition switch becomes defective, you will notice any of these symptoms.
How To Test Ignition Switch, Symptoms #1: Issues Removing Or Turning The Ignition Key
If your key gets stuck when removing or turning the key, this can be a good sign of a worn-out ignition switch. The key isn’t connecting inside the ignition switch appropriately. Besides, a failing ignition switch may cause your car engine to continue running even after removing the key.
An ignition switch is one of the most commonly used parts in a car. And like every other electrical switch, it can wear out over time and require service. If you suspect your vehicle may be having issues with the ignition switch, have it inspected by a technician to ascertain if it needs replacement.
How To Test Ignition Switch, Symptoms #2: Car Runs As Usual Then Abruptly Dies While Driving
Another common symptom of a faulty ignition switch is a vehicle that starts and then suddenly dies while driving. More often, this is a common symptom of a faulty switch. Shabby contacts in the ignition switch might cause a temporary loss of voltage due to vibration or heat. Power loss through the switch will cause the engine to misfire, stumble, or die.
An ignition switch wears from frequent use. The more you drive, the more you get to use the ignition switch. And after years, electrical contacts inside the ignition switch become corroded or worn, resulting in poor or erratic connection.
The wear issue could even be intensified by hefty key rings that put extra pressure on the ignition switch. The large heavy ring that sways while driving twists and tugs on the ignition switch. Eventually, this intensifies wear, causing the switch to fail.
How To Test Ignition Switch, Symptoms #3: Problem Powering On The Vehicle Accessories
When you’ve inserted and turned your ignition key to the “acc” position, the switch should immediately power on car accessories, such as the center console, dashboard lights, and interior lights.
When the key fails to power on the vehicle’s accessories, you may have an issue with the ignition switch. Similar symptoms can also be a result of wiring and fuse issues. Therefore, we highly recommend having your vehicle diagnosed properly for any underlying issues.
How To Test Ignition Switch, Symptoms #4: Ignition Switch Turns On But Engine Doesn’t Crack
When you turn your car ignition switch to the start position, and nothing happens, the issue may be a faulty ignition switch or a problem in the starting circuit.
For starters, check if the instrument panel warning lights come on when you turn on the key. Note that warning lights or other signs of electrical conductivity could suggest a dead battery or loose battery cables. Turn on the headlights. If there are no lights, it means either you have a problem with the battery connection or the battery is dead.
If the headlights function correctly, the issue isn’t the battery but an electrical defect in the ignition switch, starting circuit (starter, solenoid, bad relay), or the ignition switch circuit (fuse or wiring).
How To Test Ignition Switch, Symptoms #5: Overheating Ignition Switch
Another significant sign of a faulty ignition switch is if it’s excessively hot if touched. This is a good symbol that the underlying issue could be a result of your electrical system.
Your car ignition switch is linked to a succession of high-resistance cables, and either of the ends linking these wires can overheat. As a result, this causes the terminals to arc, which could melt the insulating base. If you experience this, your car may jerk relatively aggressively and won’t start in spite of recurrent efforts.
How To Test Ignition Switch, Symptoms #6: Flickering Dashboard Lights
One of the more subtle signs of an ignition switch problem can be flickering dashboard lights. As you drive or turn on your vehicle, keep an eye on your dashboard. If the lights dim, flicker, or blink sporadically, it might indicate that your ignition switch is failing. The switch may not maintain a steady electrical connection, which leads to these irregularities. Always ensure you’re not confusing this with a dying battery or a problematic alternator.
How To Test Ignition Switch, Symptoms #7: Stalling Engine
While many factors can cause an engine to stall, a malfunctioning ignition switch is one of them. A bad switch might cut off power to the vehicle’s fuel or ignition systems at random, resulting in the engine stalling. This can be especially dangerous if it happens while driving. If your engine frequently stalls without apparent cause, it might be worthwhile to check the ignition switch among other potential culprits.
How To Test Ignition Switch, Symptoms #8: Difficulty in Starting
When you turn the key, and the car either doesn’t start immediately or requires multiple tries, the ignition switch might be at fault. Keep in mind, that there could also be other reasons, such as a malfunctioning starter or a dying battery. However, if those components are in good shape and you’re still facing starting issues, it’s time to inspect the ignition switch.
How To Test Ignition Switch, Symptoms #9: No Noise from the Starter Motor
Generally, when the ignition switch is turned, you’ll hear the starter motor’s distinctive sound. However, if you turn the key and the starter remains silent, the ignition switch may not be transmitting the necessary power. While the starter motor itself could be faulty, if it’s in working order, your ignition switch might be the troublemaker.
How To Test Ignition Switch, Symptoms #10: Car Accessories Not Functioning Properly
Your car’s ignition switch doesn’t just start the engine; it also controls many other vehicle accessories. If you notice certain components, like the radio, air conditioner, or windshield wipers, behaving erratically or not working at all, the ignition switch could be the issue. Always ensure you’ve ruled out individual accessory malfunctions before narrowing it down to the ignition switch.
How To Test Ignition Switch, Symptoms #11: Unexpected Vehicle Shutdowns
It’s alarming when a vehicle shuts down unexpectedly, especially during a drive. Such shutdowns can stem from a faulty ignition switch failing to maintain its electrical connection. This can be both dangerous and inconvenient. Always prioritize safety, pull over if safe to do so, and have your vehicle checked immediately.
How To Test Ignition Switch, Symptoms #12: Car Won’t Stay Started
You might get your car started after a couple of tries, but if it won’t stay running, this too can indicate an ignition switch issue. The switch might not be able to maintain a connection, causing the vehicle to shut down soon after starting.
Remember, any symptom associated with the ignition switch warrants quick attention. Ignoring these signs can lead to bigger issues down the road. Always consult with a trusted technician if you suspect any problems with your ignition switch to ensure your safety and the longevity of your vehicle.
Test Ignition Switch
The ignition switch provides voltage to the ignition coil and ignition control module. The ignition system contains two wires linked to the switch’s run terminal. One establishes a connection to the module, and the other goes into the primary resistor and coil.
To examine the switch, you’ll first have to remove it from the slot and check the continuity and resistance along the terminals. However, make sure to examine whether the connections to the ignition switch are working.
In that case, you can check the voltage of the ignition switch using two tools – A multimeter and a 12 Volt Test Light.
How To Test Ignition Switch With A Multimeter
Below are various techniques to test the ignition switch with both an analog and a digital multimeter.
Technique 1
Here’s the first technique that you could practice in testing the ignition switch…
Step #1
Locate the fuse panel under the steering wheel and open it. Pull the starter signal fuse with your fuse pullers from the panel.
Step #2
Afterward, cautiously and closely inspect the metal strip to check if it’s in good condition. If damaged or burned, substitute it with an effective component with the same amperage as the damaged one.
Step #3
Open your car’s hood and switch on the knob on your digital multimeter (DMM) to the “volts” symbol. Connect the black lead of your multimeter to your car’s frame and the red lead of your voltmeter to the positive terminal on the battery. For a fully functional battery, the voltmeter reading should be 12.6 volts.
If it reads anything less than 12V, it means your battery is dead and needs replacement. Start by putting your key into the switch and start the engine. If it starts appropriately, then your ignition switch is functioning correctly.
Suppose the engine fails to start, and you hear a clicking sound when turning the key to position (III), the fault isn’t with the switch. If you don’t hear anything when you turn the key to position (III), and the engine doesn’t start, the ignition switch is probably faulty and needs to be replaced.
Technique 2
Meanwhile, if the first method didn’t work, here’s an alternative…
Step #1
Remove one of the spark plug wires and shove an old plug into the plug boot’s end. Put the metal plug on any metal surface of the engine. As soon you’ve placed the ignition key in the ignition switch, power on the engine. Now check if there’s a spark on the old plug. Assuming there are no sparks on the plug, it’s clear that the ignition switch is obviously defective and needs to be replaced.
Step #2
Check the positive terminal voltage reading while the key is in the switch. Place the red lead of the voltmeter on the coil’s positive end and the black tip on the battery’s negative terminal. Afterward, keep the ignition in the run position once you turn it on. If your ignition switch is working correctly, your battery’s voltage ought to be reading at the positive end.
If the reading is very low, or you can’t get any reading at all, then there’s an issue with the ignition switch or ignition wiring.
Step #3
Find the ignition module’s positive terminal and swivel the key to the ‘run’ position. Don’t start the engine after that. Grasp the red lead of the multimeter and tug the module wire through it. Make sure there’s a voltage reading at the wire. If there’s no reading, it means there may be an open circuit between the cable and the switch.
Step #4
Locate the negative wire of the ignition module and run it through the multimeter’s red lead. After that, remove the cap on the distributor without bringing out the cables of the spark plug. Using your hand, start the car engine, or rotate the middle shaft on the distributor.
Check the distributor keenly as the engine starts moving. If the rotor isn’t moving, either the gears or the distributor are faulty. Here, the multimeter should display a zero reading, or the battery’s voltage should be reading zero if the distributor and the ignition switch are functional. When the multimeter isn’t displaying the correct voltage, then your ignition switch ought to be changed.
Technique 3
And, just in case, here’s a third alternative method, if the other two didn’t work…
Step #1
For starters, make sure the multimeter is functional. Do so by swerving the resistance to “XI.” This occurs after switching on the multimeter and choosing the ohm function (Ω) function. Suppose the multimeter reads zero resistance, then the VOM is working. You can, however, ignore this process if your multimeter has an auto-ranging ability.
Step #2
Turn the key until you reach the off position. Put the positive lead of your meter at the rear side of the ignition module’s power supply cable and the negative lead at your distributor’s base.
Step #3
Measure the battery’s voltage using your multimeter, and make sure the key is positioned at the run position on your ignition switch. If the multimeter displays a voltage of less than 90% of your battery’s voltage, then it’s without a doubt, you have a faulty ignition switch.
How To Test Ignition Switch With A Test Light
Here’s another way of doing this, but this time, using a test light, instead…
Step #1
Switch off the ignition switch and disconnect the module’s wire connector. Also, detach the starter solenoid’s S terminal. This will stop the engine from starting despite turning the ignition key to the ‘run’ position.
Step #2
Rotate the ignition key and place it in the run position. Probe the red wire connection to test voltage. Do the same on the ignition coil’s battery terminal.
Refer to the following video for more information.
Step #3
Rotate the switch to the starting position and probe the ignition coil’s battery terminal and the module’s wire connector to examine the voltage. If there is no voltage on the tested parts, then it means your ignition switch is faulty and needs replacement.
Ignition Switch Replacement
Once you’ve tested the ignition switch and identified it as the primary underlying issue in your vehicle’s electrical system, it’s important to have it replaced. Fortunately, replacing an ignition switch is a fairly candid process that only needs common hand tools. However, make sure to refer to an application repair manual prior to performing this task on your own. Here are some pointers if you need to replace your car’s ignition switch.
Section 1: Taking Apart The Interior
Here’s the first part of replacing the ignition switch…
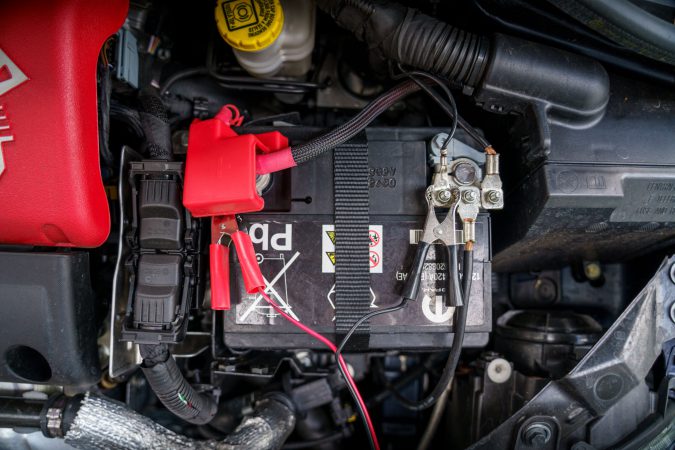
Step 1: Detach The Negative Terminal On Your Car Battery
You can achieve this by first locating the battery in your car’s trunk or engine bay. It resembles a black box with a negative (-) and positive (+) post sticking on it. Use a suitable wrench to open the nut holding the negative terminal and slip it off the post.
Note that you don’t necessarily have to take the positive wire off its terminal.
Step 2: Take Out The Trim Surrounding The Steering Wheel
Assuming you’re seated at the driver’s seat, you’ll likely see various plastic trim fragments between you and the switch. Carefully take them out, either by removing the bolts and screws that hold them in place or popping them off their plastic clips. This can be done using a socket wrench and a screwdriver. Place the pieces aside so they won’t be damaged or stepped on.
Step 3: Detach The Steering Wheel
In other vehicles, you may possibly replace the ignition switch without getting rid of the steering wheel. But if you can’t access the top part of the switch even after removing the trim pieces, then you’ll need to take out the steering wheel. Refer to your car repair manual for professional guidance on how to safely remove the steering wheel from its position so as not to damage the airbag or set it off.
Step 4: Let Go Of The Clips In The Module Cover
You may find a plastic cover housing the ignition module. In that case, press release on the clips located on both sides of the cover. If it’s hard to access using your fingers, you may want to use a screwdriver. Upon pressing the releases, pull the cover out of the module and place it somewhere safe till you embark on reassembling the dash.
Section 2: Removing The Ignition Switch
Once that’s done, continue with the next phase…
Step 1: Thrust The Ignition Key And Switch It To The Position Marked “Accessory”
The switch ought to be positioned in the accessory position prior to releasing it from the module. This position is before engaging the starter and would often allow you to run the car’s electronics without running the engine. Suppose you lack the ignition key. You may have to turn the module with the help of a flathead screwdriver.
Step 2: Shovel The Release Pin Into The Module Using A Screwdriver
Probe the module’s top till you locate a slightly smaller hole in diameter (somewhat smaller than that of a pencil). Next, place the screwdriver in the hole and push it downwards onto the release pin in the inner part.

Step 3: Remove The Faulty Ignition Switch
Afterward, gently pull out the switch from its position under the steering wheel while still pressing the release pin. The ignition switch ought to come out with much ease, but it’s usual to stick partly in ancient cars, which have gathered debris and dust around the cylinder.
Step 4: Buy A New Switch
Purchase a new ignition switch from a particular dealership that will provide you with a similar replacement to the faulty one. Just provide them with the model, make, and year of your car coupled with the VIN to get the correct part.
You can also purchase an aftermarket switch from an auto parts store. Just for some context, check out our guide on the cost to replace alternator at dealership.
Section 3: Installing The Replacement
Finally, we’re onto installing the new ignition switch…
Step 1: Press The Release Pin In The Switch So It’s Even With The Side
Squeeze in the release pin to slide the ignition switch to position inside the module. Hold the pin until you’ve entirely inserted the switch. Afterward, slide the new ignition switch into its position on the steering column. Line up the location of the release pin and the shape of the cylinder with the overlapping grooves inside the module.
Keep pushing till you hear a clicking sound when the release pin is set into position in the column. Suppose you don’t notice a clicking sound from the pin; it means the ignition switch is not yet fitted correctly. You’ll need to push on the switch slightly for it to click to place.
Step 2: Reconnect Your Battery And Assess The Ignition Switch
Make sure to test the ignition switch before reassembling the dashboard. To ensure there are no problems whatsoever. Reconnect the wire to the battery’s negative terminal, insert the ignition key in the switch, and start the vehicle. If the car starts with issues, take away the switch and reinstall it.
Step 3: Shut Off The Engine And Detach The Battery Once More
Know that the switch works properly, you can start re-assembling the interior. Get the cable off the battery’s negative terminal for safety purposes.
Step 4: Put Back The Dash Conversely Of How You Disassembled It
Commence by installing the preceding parts removed, followed by other components in that order. Suppose you experience difficulty getting the parts back together, resort to your car’s repair manual for assistance.
Make sure to use the clips or screws to secure each part while you proceed, and don’t force the details back together; they might break. If something doesn’t go on appropriately, take it out and examine things to ascertain the main issue stopping it from fitting correctly.
After everything fits perfectly and the ignition switch is perfectly functioning, reconnect the wire to the negative terminal of the battery and stiffen it using the correct-sized wrench.
How To Start A Car With Bad Ignition Switch
Well, you know and understand how to test ignition switches and replace a faulty one. But what if you’re driving somewhere and suddenly experience specific symptoms of a defective ignition switch before testing it, and you’re trapped in a car that won’t start. Is there a way to bypass the switch and start your vehicle? Yes, you can do it if you have the right tools.
1. Jumper Cables
To bypass a faulty ignition switch using jumper cables, open your vehicle’s hood and locate the battery and ignition. Connect the positive terminal of the battery to the coil’s positive side. This helps to power the car’s electrical system.
Connect the starter solenoid to the battery’s positive terminal. Then unplug the switch wiring from the solenoid. Using a screwdriver, short the positive terminal of the solenoid to the post that links to the ignition switch. This will seamlessly start the engine as the solenoid is triggered.
2. Hotwiring
This process only works with old vehicles. Locate the steering wheel column and take away the plastic cover that houses the internal parts. Find the wiring connector, and ensure you get the right one and not other cables or wires. It’s usually located in the middle of the steering column.
Next is to find the starter connectors, battery, and ignition. Strip the battery wires slightly down the insulation and twist them together and interconnect the battery wire to the ignition wire. The lights will turn on as well as the electrical parts. Likewise, strip the wire about half an inch down and tap the wire on the connected battery wires to start your car engine.
In Conclusion…
The ignition switch shouldn’t be taken lightly since it’s possibly the most used switch in your vehicle. It also needs service since it is prone to wear and tear, just like any other part of a vehicle. A faulty ignition switch could cause problems, each associated with diverse symptoms. Fortunately, you’ve now learned how to test the ignition switch and troubleshoot it on your own. But if you feel stuck somewhere along the process, don’t hesitate to ask for professional help.
How To Test Ignition Switch Essential Knowledge
- An ignition switch is responsible for sending an electric signal that allows you to start your car’s engine, activate the car’s stereo, and power windows.
- A broken ignition switch can cause a lot of trouble, including failure to start the car, immediate engine shut off, and the stoppage of electrical components.
- Before replacing the ignition switch, it is important to assess it and know how to test it effectively.
- There are several methods for testing an ignition switch, including using tools such as a test light, a voltmeter, or a multimeter.
- To test an ignition switch effectively, you need to check or inspect all the connections to the switch, and then remove the ignition switch from its slot.
- Some of the symptoms of a faulty ignition switch include a sudden halt of the vehicle, stalling of the car just after starting it, encountering different switch positions, and dashboard lights flickering while driving.
- Hotwiring or using jumper cables are two methods of starting a car with a bad ignition switch.
- Hotwiring works only with older cars, and involves finding the steering wheel column, locating the wiring connector, and stripping the battery wires, ignition wires, and starter wires.
- Jumper cables can be used to start a car by connecting the battery’s positive terminal to the coil’s positive side and connecting the starter solenoid to the battery’s positive terminal.
- Learning the basics of reading electrical diagrams can help troubleshoot problems with the ignition switch and other electrical components in a car.